Social previews for each post
👋
When I rewrote my blog in Svelte I left a few features out to get it deployed sooner. One of those features was social preview images.
I simply put together a generic social preview image to use for all my posts. Not quite ideal, but a quick solution.
Today I changed that. Each blog post now has a (simple) unique social preview image! 🙌
At a high level, here’s what I did:
- Manually create a template SVG file with placeholder text for the title
- Write a script to go over all my posts and create a new SVG for each one based on the post title
- Convert the SVGs into PNGs with the correct dimensions
- Upload the files to my CMS system
1. Creating the SVG template
The social previews are not entirely unique: they are all based off the same template. This makes it a lot easier for me and a lot more consistent.
So I put together a template image with Inkscape with a couple of placeholders.
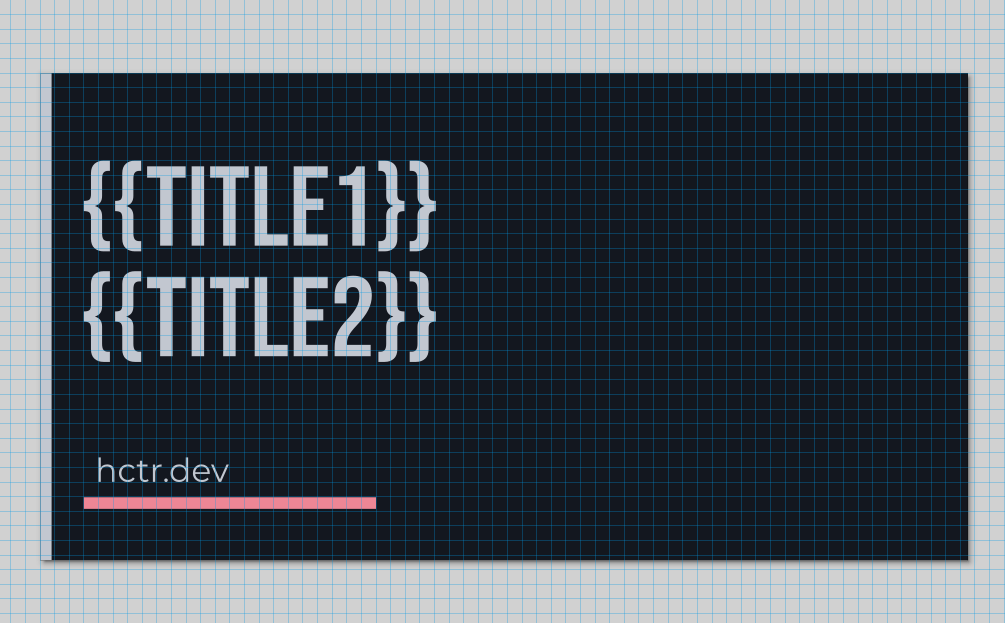
Since SVG doesn’t natively support text wrapping, I added two placeholders: one for the first line of the title, one for the second. The script handles splitting the title across both lines
In the template file I also set the export dimensions to 1200x630. This sets the size of the PNG size I will generate later on.
2. Iterate over all posts
Since all my posts are in PocketBase, I can pretty easily iterate over all of them in a NodeJS script (using js-sdk).
For each post I make a copy of the template SVG, grab the post title, split it into two lines, and replace the placeholders with the title.
The only tricky bit is making sure the title fits in the image without overflowing. Since SVG doesn’t really support wrapping, I used trial and error to find how many characters fit well on the first line, then put the rest on the second line.
(I also made sure to always split the title to avoid a blank second line if the title is too short)
3. Convert to PNG
Next I converted the SVG into a PNG file to make it more compatible. Again, I used Inkscape, but this time the CLI to handle the conversion.
The command was as simple as:
inkscape ${input} --export-type=png --export-filename=${output}I do this for all the generated images and the output looks something like:

4. Upload new images
The final step is to add these images to my CMS (PocketBase). Again, using the Javascript SDK.
Each post entry has a field social_image that links to another table where I store all my images. So I need to upload the new image to that table and then update the post to link to it.
Something like:
const data = {
  owner: post.owner,
  file: new Blob([
    readFileSync(
      path.join(OUTPUT_DIR, `${imgFileName}.png`)
    )
  ]),
  alt_text: `Social preview image with content: ${post.title}`,
  attribution_text: 'Auto-generated based on post data',
  attribution_url: '',
};
const newImage = await pb
  .collection('image')
  .create(data);

await pb
  .collection('post')
  .update(post.id, {
    social_image: newImage.id,
  });
But I also want to update any existing images so I can run the script again if I change a title or change the SVG template. But at the same time, if I make a custom social preview for a post, I don’t want to overwrite that with this script.
So I added an extra boolean field to the post custom_social_image that I can set to true if I added a custom image that I don’t want to replace. If that value is false, I’ll update the linked image with the new PNG when I re-run the script.
await pb
  .collection('image')
  .update(post.social_image, {
    file: new Blob([
      readFileSync(
        path.join(OUTPUT_DIR, `${imgFileName}.png`)
      )
    ]),
    alt_text: `Social preview image with content: ${post.title}`,
  });
From there everything works the same way it did before. In the initial build I had already added support for custom social preview images, so I’m just using that.
In short:
- Download all images listed in the
imagetable - If the post has a
social_imageassigned, set up the HTML properties in the<HEAD>section to reference that image
Maybe in the future I’ll make the social previews more interesting or more unique, but this is already an incremental improvement. And now that I already have the foundation, I only need to tweak the image generation piece.
So I’m pretty happy with this!
// the end