Hosting from home with Tailscale
In a previous post I shared how I host things from home. I wanted to expand a little on how I use Tailscale to achieve that!
I love Tailscale, it’s an awesome tool. In essence it links all your machines on a single secure network. This allows you to securely expose and use services from other machines in your Tailscale network. All without any hassle.
So how do I make use of Tailscale to self-host stuff?
Tailscale does have a built-in tool for this: Tailscale Funnel
Tailscale Funnel lets you route traffic from the broader internet to a local service running on a device in your Tailscale network (known as a tailnet). You can use it to share a local service, like a web app, for anyone to access—even if they don’t use Tailscale.
- Tailscale
But I decided to deploy my own thing instead of using that. Mainly because it was more fun, but also because I had more control and could avoid some of the restrictions around Tailscale Funnel (mainly domain names and bandwidth limits).
The concept is very similar:
- Set up a VPS
- Connect the VPS to my Tailscale network
- Configure Nginx on the VPS to forward traffic to my server
- Expose ports
80&443on the VPS - Update DNS records to point at the VPS’s public IP
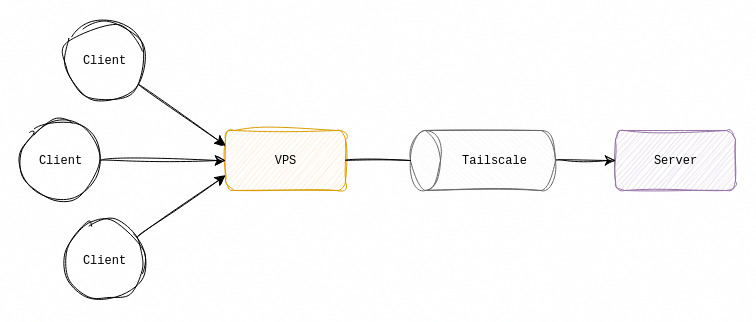
At a high level that’s it!
This allows me to host anything I want on my home server and share it with people without exposing my home IP or opening up ports on my router.
The core of this project is the nginx config needed on the VPS to correctly forward traffic to my services. Here is what I came up with:
server {
  listen 443 ssl;
  server_name *.hctr.dev;

  ssl_certificate     /etc/nginx/ssl/_.hctr.dev.crt;
  ssl_certificate_key /etc/nginx/ssl/_.hctr.dev.key;

  location / {
    proxy_set_header   X-Forwarded-For $proxy_add_x_forwarded_for;
    proxy_set_header   Forwarded $remote_addr;
    proxy_set_header   X-Real-IP $remote_addr;
    proxy_set_header   Host $host;
    proxy_set_header   Upgrade $http_upgrade;
    proxy_set_header   Connection $connection_upgrade;
    proxy_http_version 1.1;
    proxy_pass         https://<home server IP>/;
  }
}
Since I’m using the same setup for multiple domains, I create a copy of this config for each domain. Just set a different server_name on each
🔒️ HTTPS
I also need to make sure I have valid SSL certificates for my services (on both sides). The nginx proxy will terminate the SSL connection to the VPS, then create a new one from the VPS to my server.
I don’t need to have an HTTPS connection between the VPS and my server, since all communication inside the Tailscale network is encrypted anyway, but I like having it because I access the same services from within the Tailscale network, so having HTTPS avoids some headaches
I can either have different certificates (probably best-practice 🤷), or just copy the same certificates between the machines. I went for the second option since it was simpler. I already have a system to automatically renew certificates on my server, so now I just copy the renewed certificates to the VPS.
🏘️ Inside Tailscale
Another catch is that when I’m using a service from inside the Tailscale network (e.g. from my laptop), I don’t want my connection to leave the network and come back - my server is usually in the same house as me, while the VPS is 1000km away.
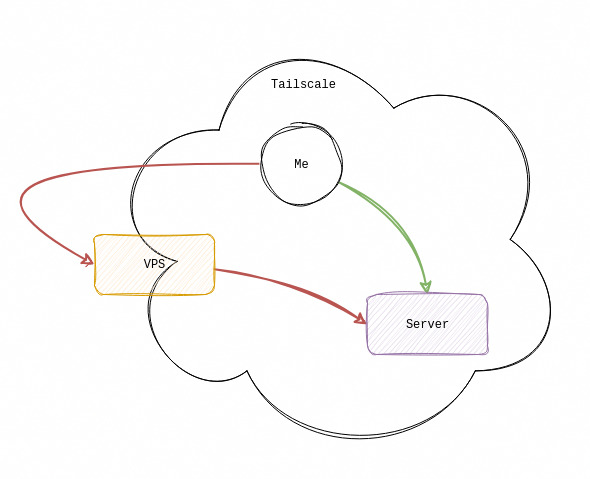
I want my requests to follow the green arrow
So I also setup special DNS overrides inside the Tailscale network that point at my home server’s Tailscale’s IP. That way I connect to it “locally”. This gives me much better speeds since Tailscale will connect the two nodes more directly.
This was pretty easy to setup since I use NextDNS as my Tailscale global nameserver. In my NextDNS console I just add a rewrite to point my domain at my server’s Tailscale IP.

📜 IP Logging
Another snag I needed to solve was logging/using the correct IP.
My first version of this was a simple SSH tunnel that forwarded raw connections from my VPS to my server. But this meant I lost the source IP at the server - as far as my server knows the source of the request is always the VPS, since that is where it needs to send the response back to.
The most obvious place where this was a problem was web analytics. My tool got very confused because all requests seemed to be coming from the same IP.
The solution for that is to use an HTTP proxy. This kind of proxy understands the protocol and can add headers to list the real source of the request. This is part of the config I added for nginx:
proxy_set_header X-Forwarded-For $proxy_add_x_forwarded_for;This tells nginx to add the X-Forwarded-For header to any HTTP/S requests it sends on to my server. Most services will be able to handle this header (either automatically, or with some config) to make sure the IP that is logged is the real source and not the VPS.
That was it! It has been working flawlessly for a long time now, so I’m pretty happy.
It does cost some money to keep the VPS running, but this kind of application is so light that pretty much any VPS will do - just make sure it has a good network connection and a generous bandwidth limit! 🔥
👋
// the end