FRP Reverse Proxy
This post describes the process to use FRP as a self-hosted reverse proxy.
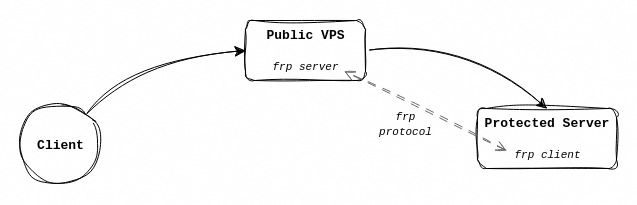
The goal is to allow connections to a firewalled server by using a “middleman” server. I’ve used this to access my home server when away from home by proxying requests through a public VPS.
The process has two parts to it, the “client” and the “server” (to make things confusing, both are servers in this scenario):
- The server acts as the “man in the middle”
- The client acts as the final destination for incoming requests
- It is the “client” of the “man in the middle” server
📥️ Install
- Download binary
wget https://github.com/fatedier/frp/releases/download/v0.42.0/frp_0.42.0_linux_amd64.tar.gzChange the version as necessary
- Extract & install
tar -xf frp_0.42.0_linux_amd64.tar.gz
mv frp_0.42.0_linux_amd64.tar.gz/frpc frp_0.42.0_linux_amd64.tar.gz/frps /usr/sbin/
Make sure to change file paths as necessary if a different version was downloaded
🔧 Setup server
The server acts as a “man in the middle” for connections going to the “protected” server.
First setup the frps.ini file to something like this:
[common]
bind_port = 80
The bind_port is the port the client will connect to. It serves as a protocol port. In this case I am using port 80 to avoid it being blocked. But any port will do.
Then run the frp server with the following command:
./frps -c frps.ini🔌 Setup client
The client now has to be configured to connect to the server and setup routes.
Create a frpc.ini file with the following content:
[common]
server_addr = 123.123.123.123
server_port = 80

[ssh]
type = tcp
local_ip = 127.0.0.1
local_port = 22
remote_port = 443
Make sure to change the server IP as necessary.
In the [common] area, define the server IP and the protocol port to use (bind_port in the frps.ini file).
The [ssh] section defines as specific “route” that the client is exposing via the server.
- The
typedefines the connection type (e.g.tcp,udp, etc) - The
local_ipis usually127.0.0.1, but could be something else to forward the connection to another system on the network - The
local_portis the port any incoming connections get sent to - The
remote_portis the port that the server will expose for this connection (make sure the port you choose is not blocked by the server firewall)- In this case I am using port 443 to avoid it being blocked
With the above config, I can start the client with the following command:
./frpc -c frpc.ini🔒️ Token Authentication
Setting up tokens adds an extra layer of protection by only allowing “clients” with the correct token to connect to a given “server”.
This does not protect user connections that are forwarded to the “protected” server, only the link between the FRP “client” and “server”.
To enable token-based authentication add the following properties to both the server and the client:
[common]
authentication_method = token
token = 123abc
Make sure to change the token value and ensure it matches on the server & client.
▶️ Use Proxy
Once that is up and running, I can SSH into the “protected” server by running:
ssh <username>@<server ip> -p 443The connection going to port 443 on the “server” gets forwarded down the frpc connection to the “client”. It then gets forwarded on to port 22 on the “client” (i.e. the protected server).
🚝 SSH Tunnel
Note that if you expose the protected server’s SSH port through FRP, you can layer SSH on top of FRP to create extra tunnels. For example, on your machine you want to access port 8080 on the protected server, but you only have SSH on port 22 being proxied through FRP, you can create an SSH tunnel for port 8080 and access it locally.
ssh <username>@<server ip> -p 22 -L 8080:localhost:8080You can then access port 8080 on the protected server at http://localhost:8080 🪄
// the end